KY-028 NTC Thermistor Temperature Sensor:
The KY028 sensor is a sensor that uses NTC temperature resistance. The purpose is not to show the ambient temperature. NTC sensors produce On and Off (0/1) according to the temperature value we set. One of the common uses is to ensure that fans that provide cooling of electronic circuits that produce high heat, such as power supplies, operate when the specified frequency is exceeded. The resistance value decreases as the NTC resistance on it heats up. It can be used in various circuits using this feature.
The temperature sensitivity is changed with the trimpot on this sensor module and the required temperature value is determined.
An example code. We can use the KY-028 temperature sensor and understand the operating logic.
int Analog_Data = A0;
int Digital_Data = 7;
String Durum;
void setup ()
{
  pinMode (Analog_Data, INPUT);
  pinMode (Digital_Data, INPUT);
  Serial.begin (9600);
}
void loop ()
{
 float Analog;
 int Digital;
  Analog = analogRead (Analog_Data);
  Digital = digitalRead (Digital_Data);

  if (Digital == 1) Durum = "  AÇIK"; else Durum = "  KAPALI";
  Serial.print ("Analog değer: "); Serial.print (Analog, 2);
  Serial.print (" / ");
  Serial.print ("Dijital değer: "); Serial.print (Digital, 2);
  Serial.println (Durum);

  delay (1000);
}
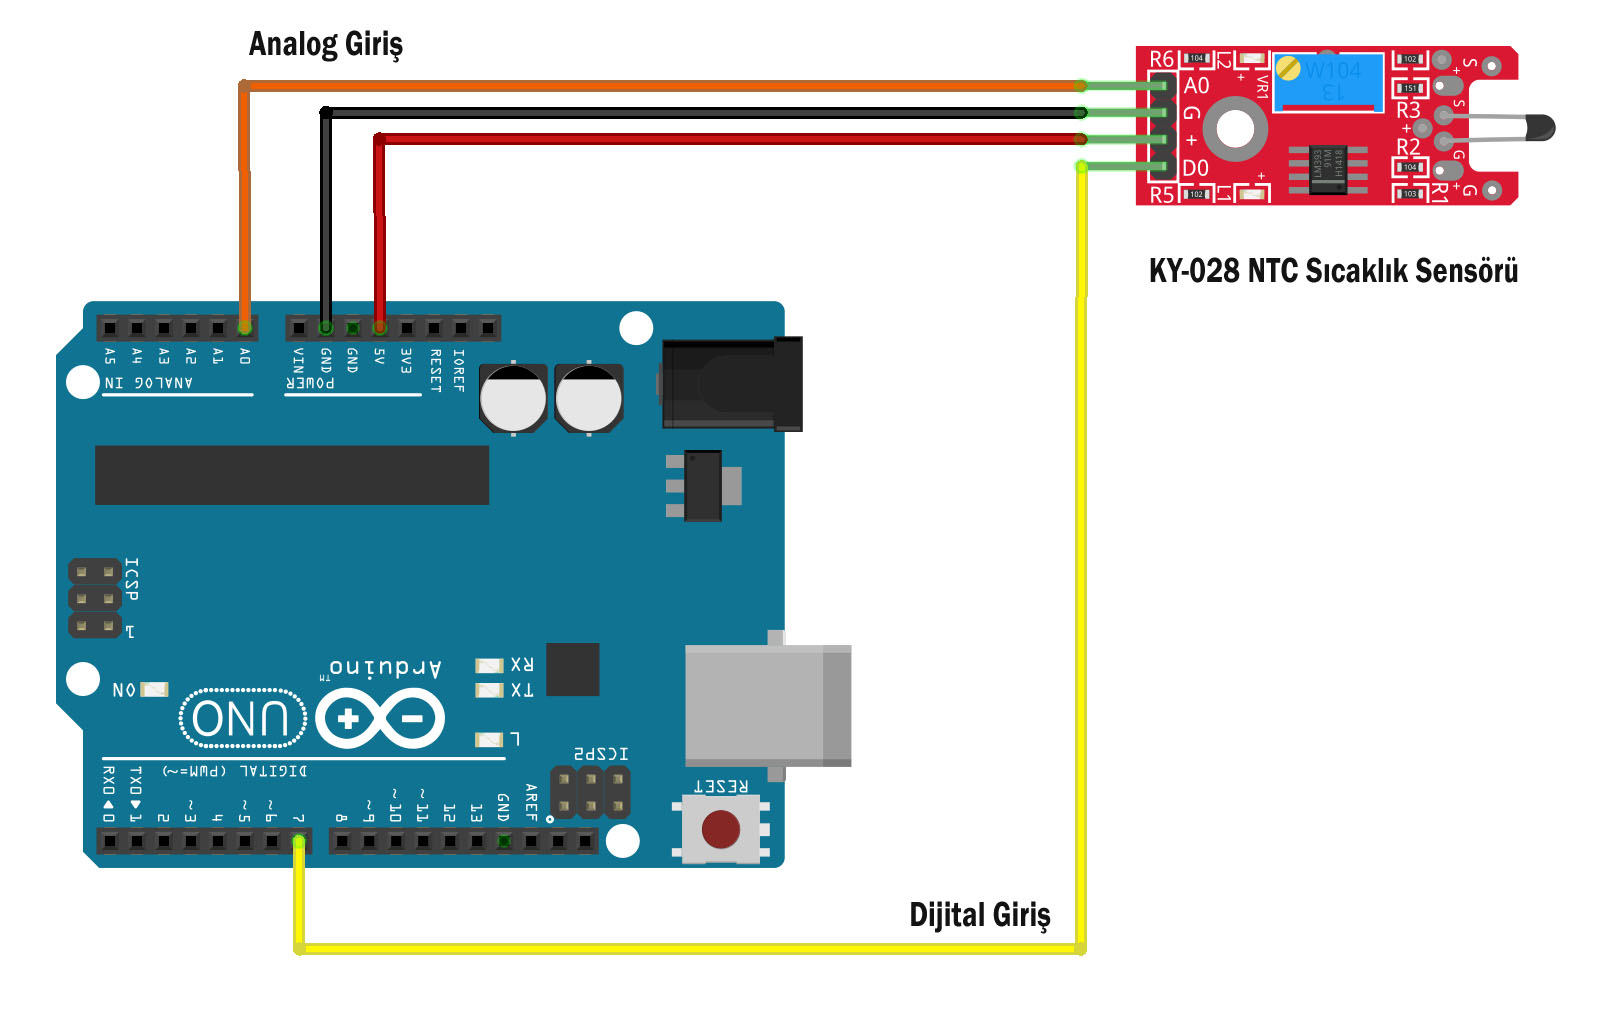
Arduino ve KY028 Sensor Connection:
Sensor A0 (Analog) – Arduino A0
Sensor G(Ground) – Arduino G
Sensor +(Pozitive) – Arduino 5V
Sensor D0(Digital) – Arduino 7 (or other digital input)
KY028 Thermistor Sensor and Fan (OLED Screen)
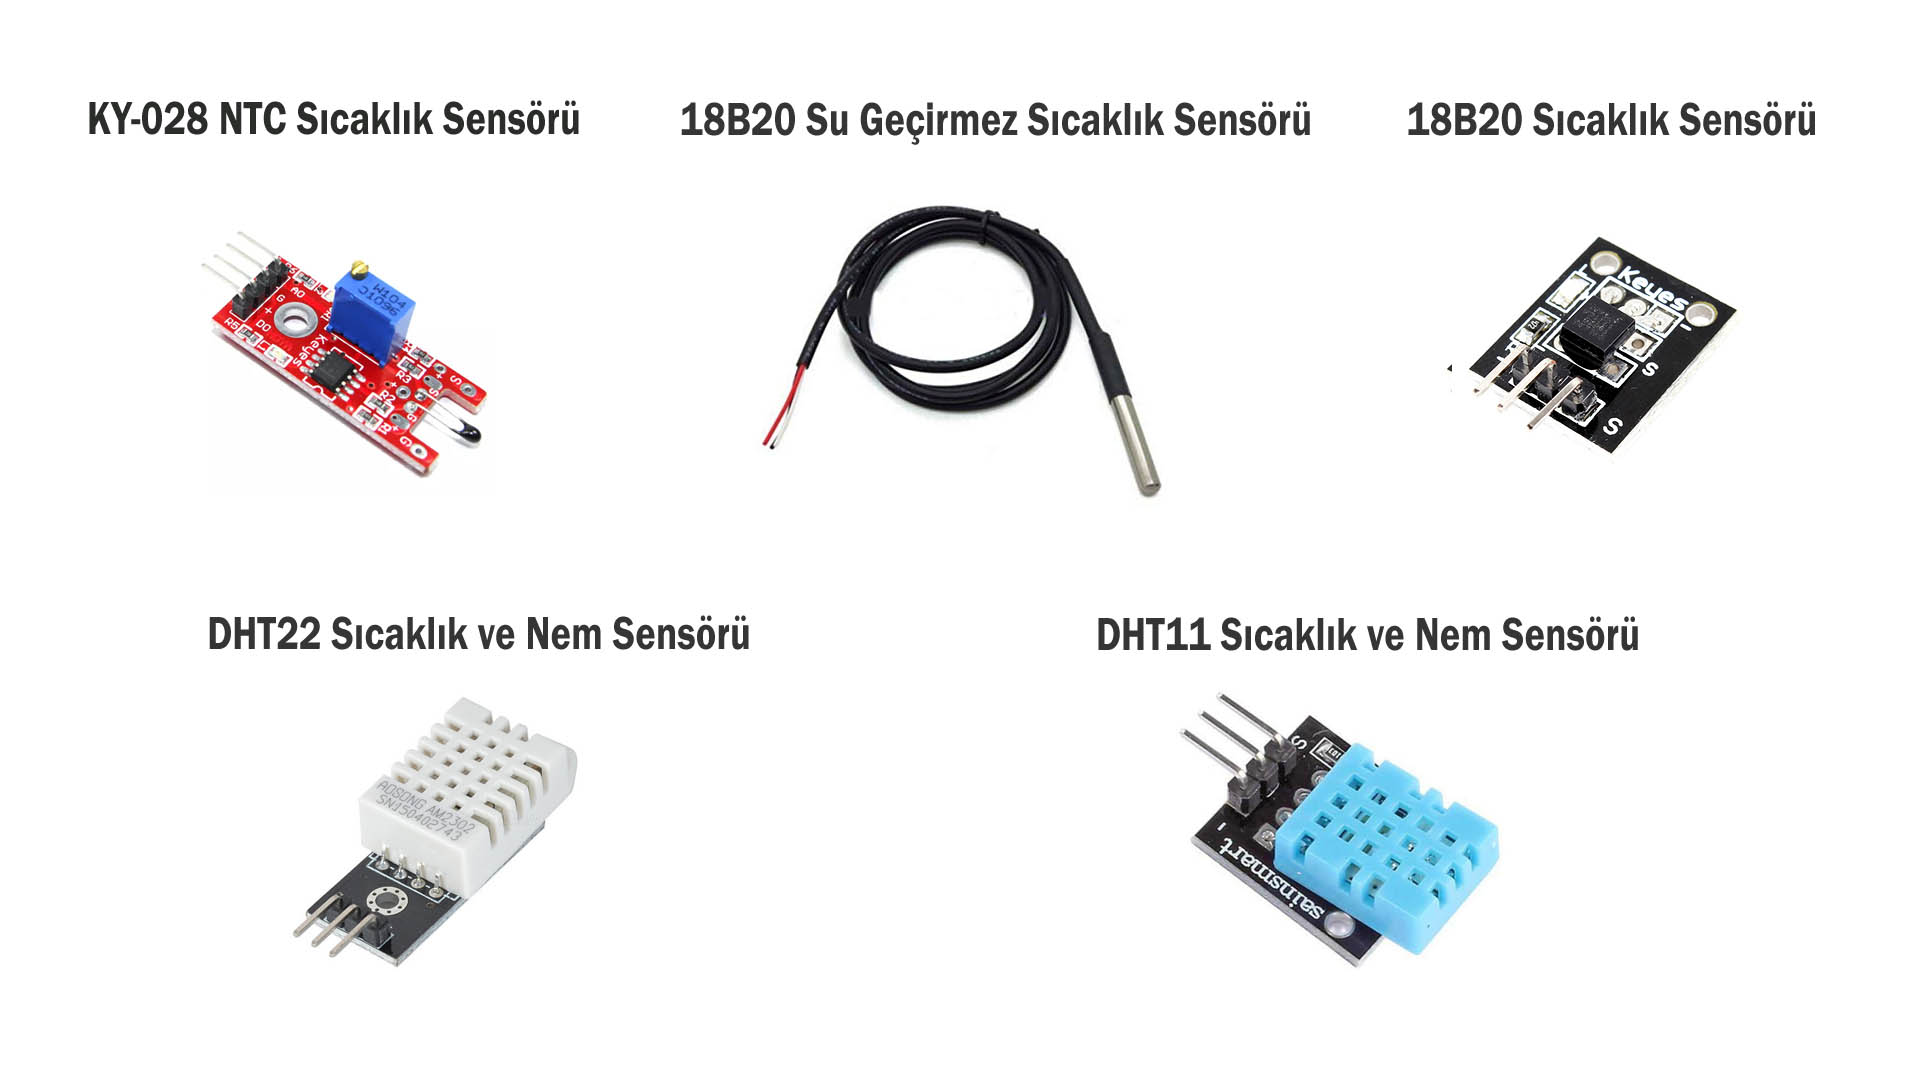
Used materials:
KY-028 Thermistor Temperature Sensor
KY-001 Temperature Sensor
DHT-11 Temperature and Humidity Sensor
18B20 Waterproof Probe Sensor (for Fluid temperature measurements)
BD139 NPN Transistor
1.3 Inch Oled Display (SSD1106) 4 Pin
4.7K Resistor
1K Resistor
Arduino Uno
Fan
// KY028 Sensor Oled screen and Fan KY028 & 1.3 inc OLED & Fun)
#include "U8glib.h"
U8GLIB_SH1106_128X64 u8g(U8G_I2C_OPT_NO_ACK);

int Analog_Data = A0;
int Digital_Data = 7;
String Durum;
float Analog;
int Digital;

void draw(void) {

u8g.setFont(u8g_font_unifont);

u8g.setPrintPos(0, 20);
u8g.print("DIGITAL VERI: ");
u8g.setPrintPos(105, 20);
u8g.print(Digital);

u8g.setPrintPos(0, 45);
u8g.print(Durum);

}

void setup(void) {
  // u8g.setRot180();
  pinMode (Analog_Data, INPUT);
  pinMode (Digital_Data, INPUT);
  pinMode(2, OUTPUT);
}

void loop(void) {

  Analog = analogRead (Analog_Data);
  Digital = digitalRead (Digital_Data);
if (Digital == 1){
         Durum = "FAN OPEN";
         digitalWrite(2, HIGH);
    }
    else {
         Durum = "FAN CLOSED";
         digitalWrite(2, LOW);
    }

      // picture loop
u8g.firstPage();
  do {
    draw();
  } while( u8g.nextPage() );

  delay(500);
}
The Arduino has a maximum output of 5V. The fan operates with 9-12V. Therefore, the fan power must be external. We use a BD139 NPN transistor as a switch.

KY001 Temperature Sensor vs DHT11 Temperature and Humidity Sensor vs 18B20 Woter Proof Sensor (OLED Screen) Kod
// KY001, DHT11, 18B20 Prob Sensor

#include <DallasTemperature.h>
#include <DHT.h>
#define DHTPIN 12
DHT dht(DHTPIN, DHT11);
#include "U8glib.h"
U8GLIB_SH1106_128X64 u8g(U8G_I2C_OPT_NO_ACK);

#define BUS 2 // Data connection at Arduino Pin 2
OneWire oneWire(BUS);
DallasTemperature s1(&oneWire); // KY001
DallasTemperature s2(&oneWire);

void ekrana_yaz(void) {

float t = dht.readTemperature(); //DHT11 Temperature
float h = dht.readHumidity();  // DHT11 Humidity

u8g.setFont(u8g_font_unifont);
u8g.setPrintPos(0, 10);
u8g.print("PROB  :");
u8g.setPrintPos(65, 10);
u8g.print(s1.getTempCByIndex(0)); // 0 first IC. 1 second IC (18B20 Prob & KY001)
u8g.setPrintPos(108, 10);
u8g.print("C");

u8g.setPrintPos(0, 25);
u8g.print("KY001 :");
u8g.setPrintPos(65, 25);
u8g.print(s1.getTempCByIndex(1));
u8g.setPrintPos(108, 25);
u8g.print("C");

u8g.setPrintPos(0, 40);
u8g.print("DHT11 :");
u8g.setPrintPos(65, 40);
u8g.print(t);
u8g.setPrintPos(108, 40);
u8g.print("C");

u8g.setPrintPos(0, 55);
u8g.print("DHT11 : ");
u8g.setPrintPos(65, 55);
u8g.print(h);
u8g.setPrintPos(108, 55);
u8g.print("%");
}

void setup(void) {
  Serial.begin(9600);
  s1.begin(); // sensor 1
  s2.begin(); // sensor 2
  dht.begin();
}

void loop(void) {

  s1.requestTemperatures();  // Send the command to get temperatures
  s2.requestTemperatures();

      // picture loop
  u8g.firstPage();
  do {
    ekrana_yaz();
  } while( u8g.nextPage() );
  delay(500);
}
Info: The Oled display library and display commands included in the code are for SH1106 displays. SSD1306 may not work with displays. In this case the Adafruit library can be used. (You will need to make changes to the screen commands.)
Required library files:
SH1106 Çipli OLED ekran için U8glip Library for SH1106 Oled
18B20 Dallas Temperature Library
DHT11 Temperature and Humidity Sensor Library
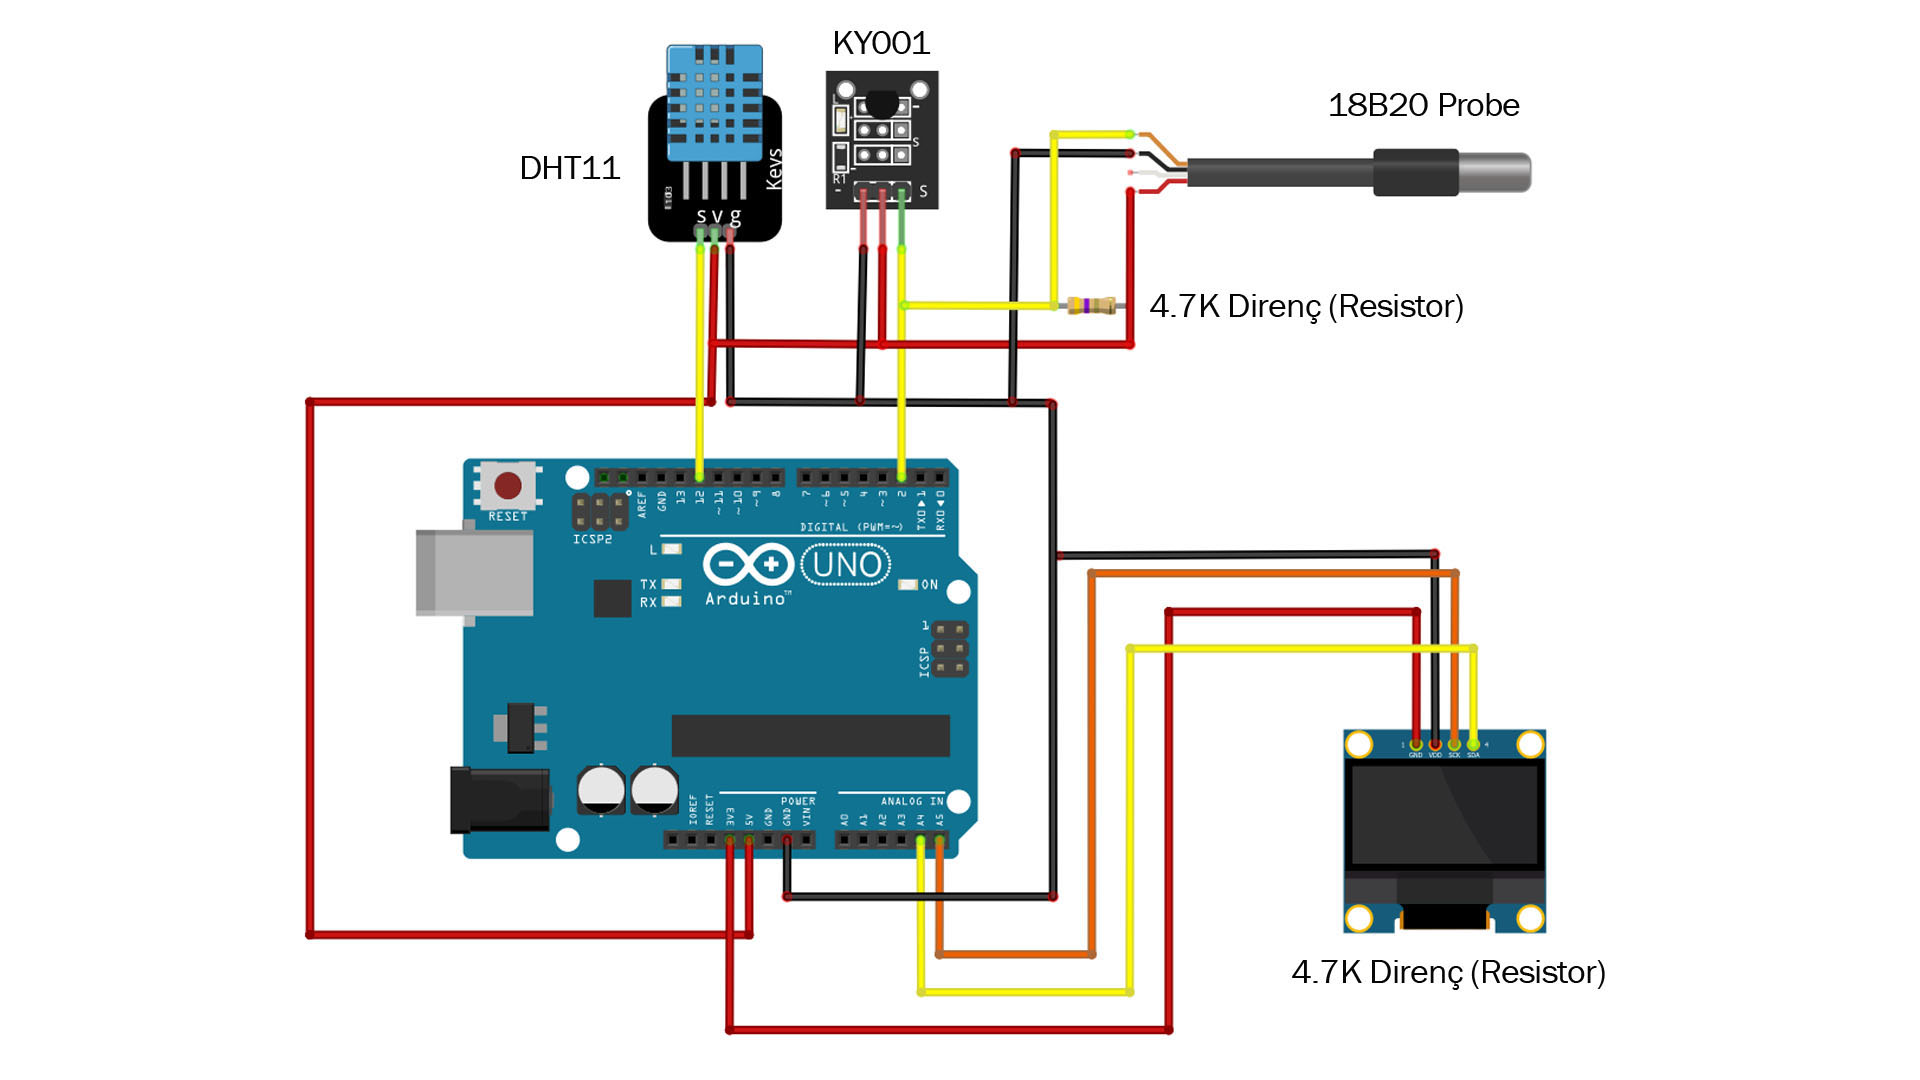
* 4.7K resistance is required for 18B20 Probe Sensor.