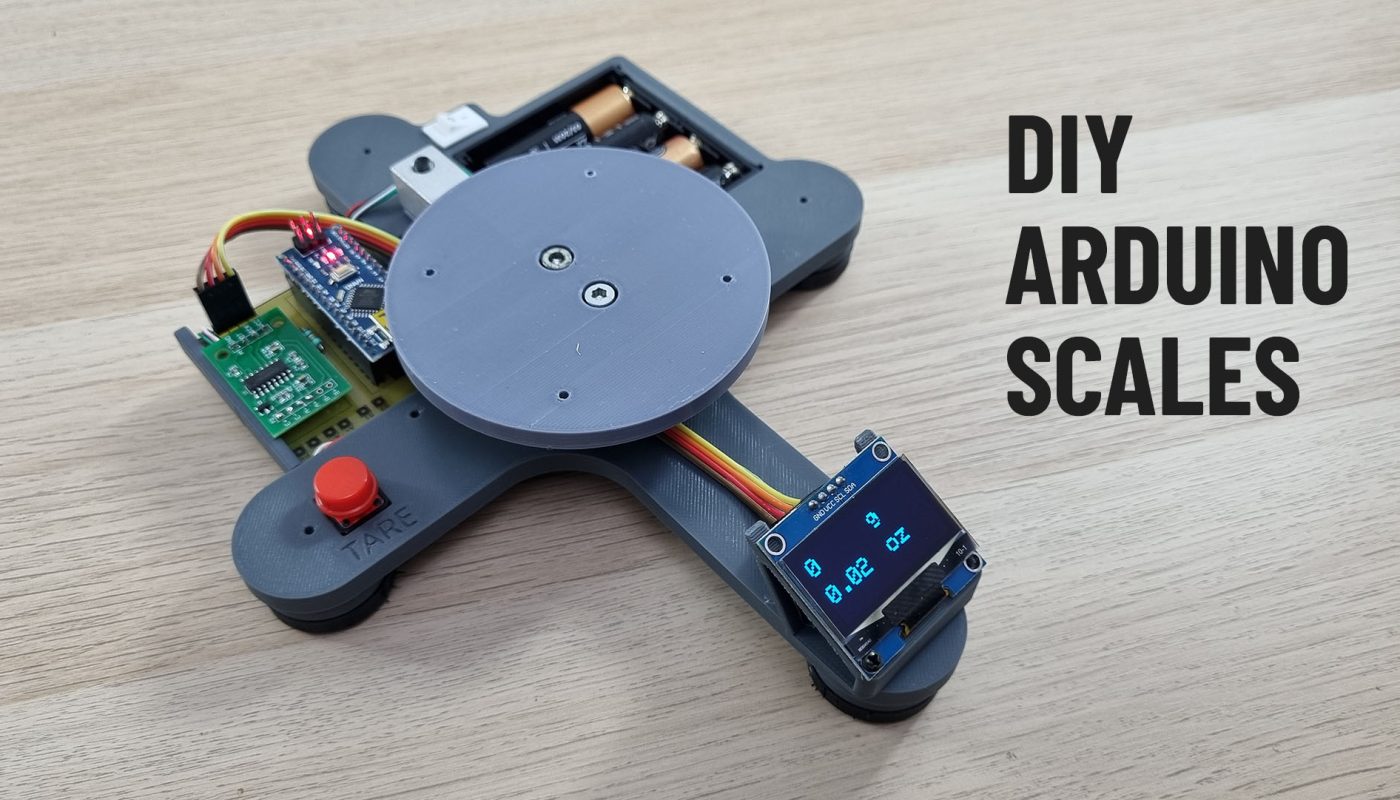
How to make a precision scales with Arduino and HX711 module? DIY SCALES.
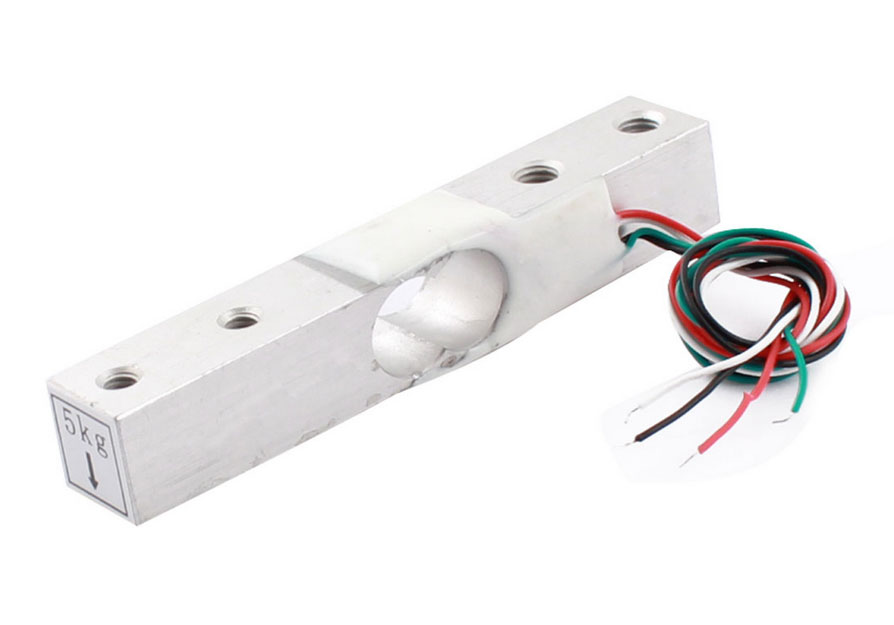
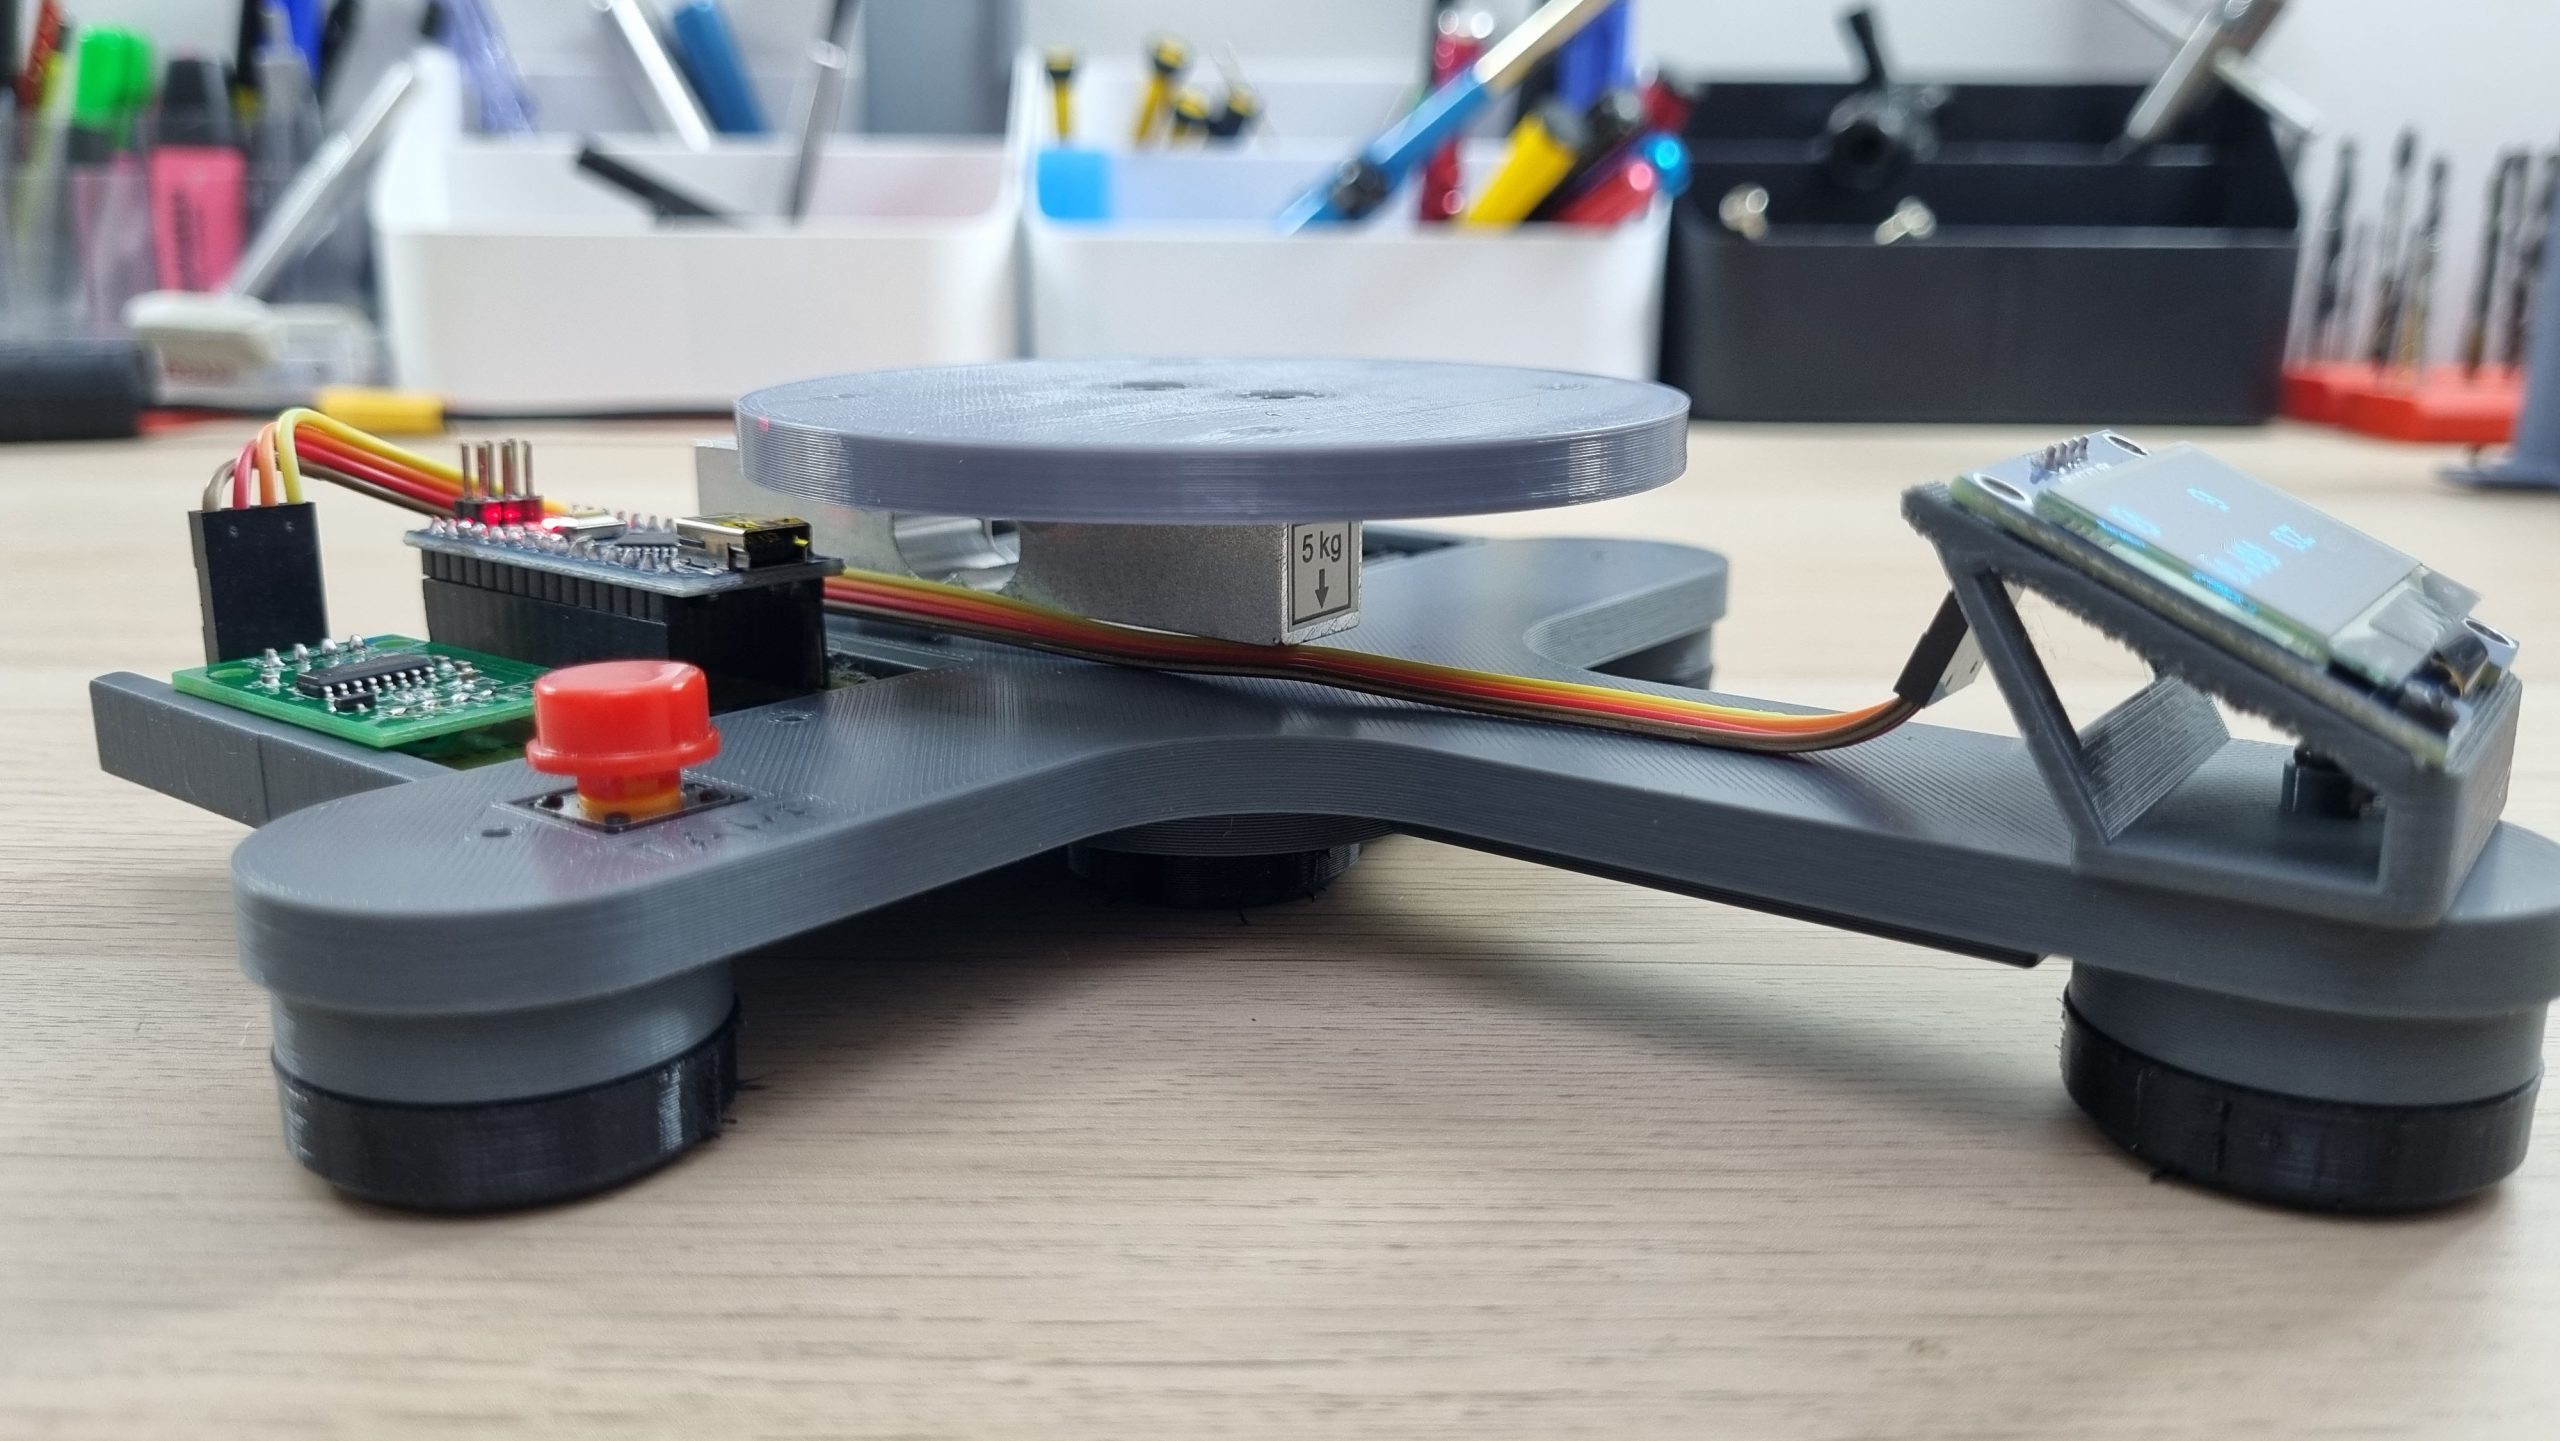
In this project, I used a load cell with 5kg support. If you wish, you can use 1kg, 10kg or 20kg versions.
If you prefer to use a load cell other than 5kg (5000g), you must change the “5000” value in the command line below. For example, for 1kg it should be “1000”. This command line causes a warning to appear on the screen when the limit of the load cell is exceeded.
Like “if (weight>=1000)” instead of “if (weight>=5000)”…
DOWNLOAD LINK..
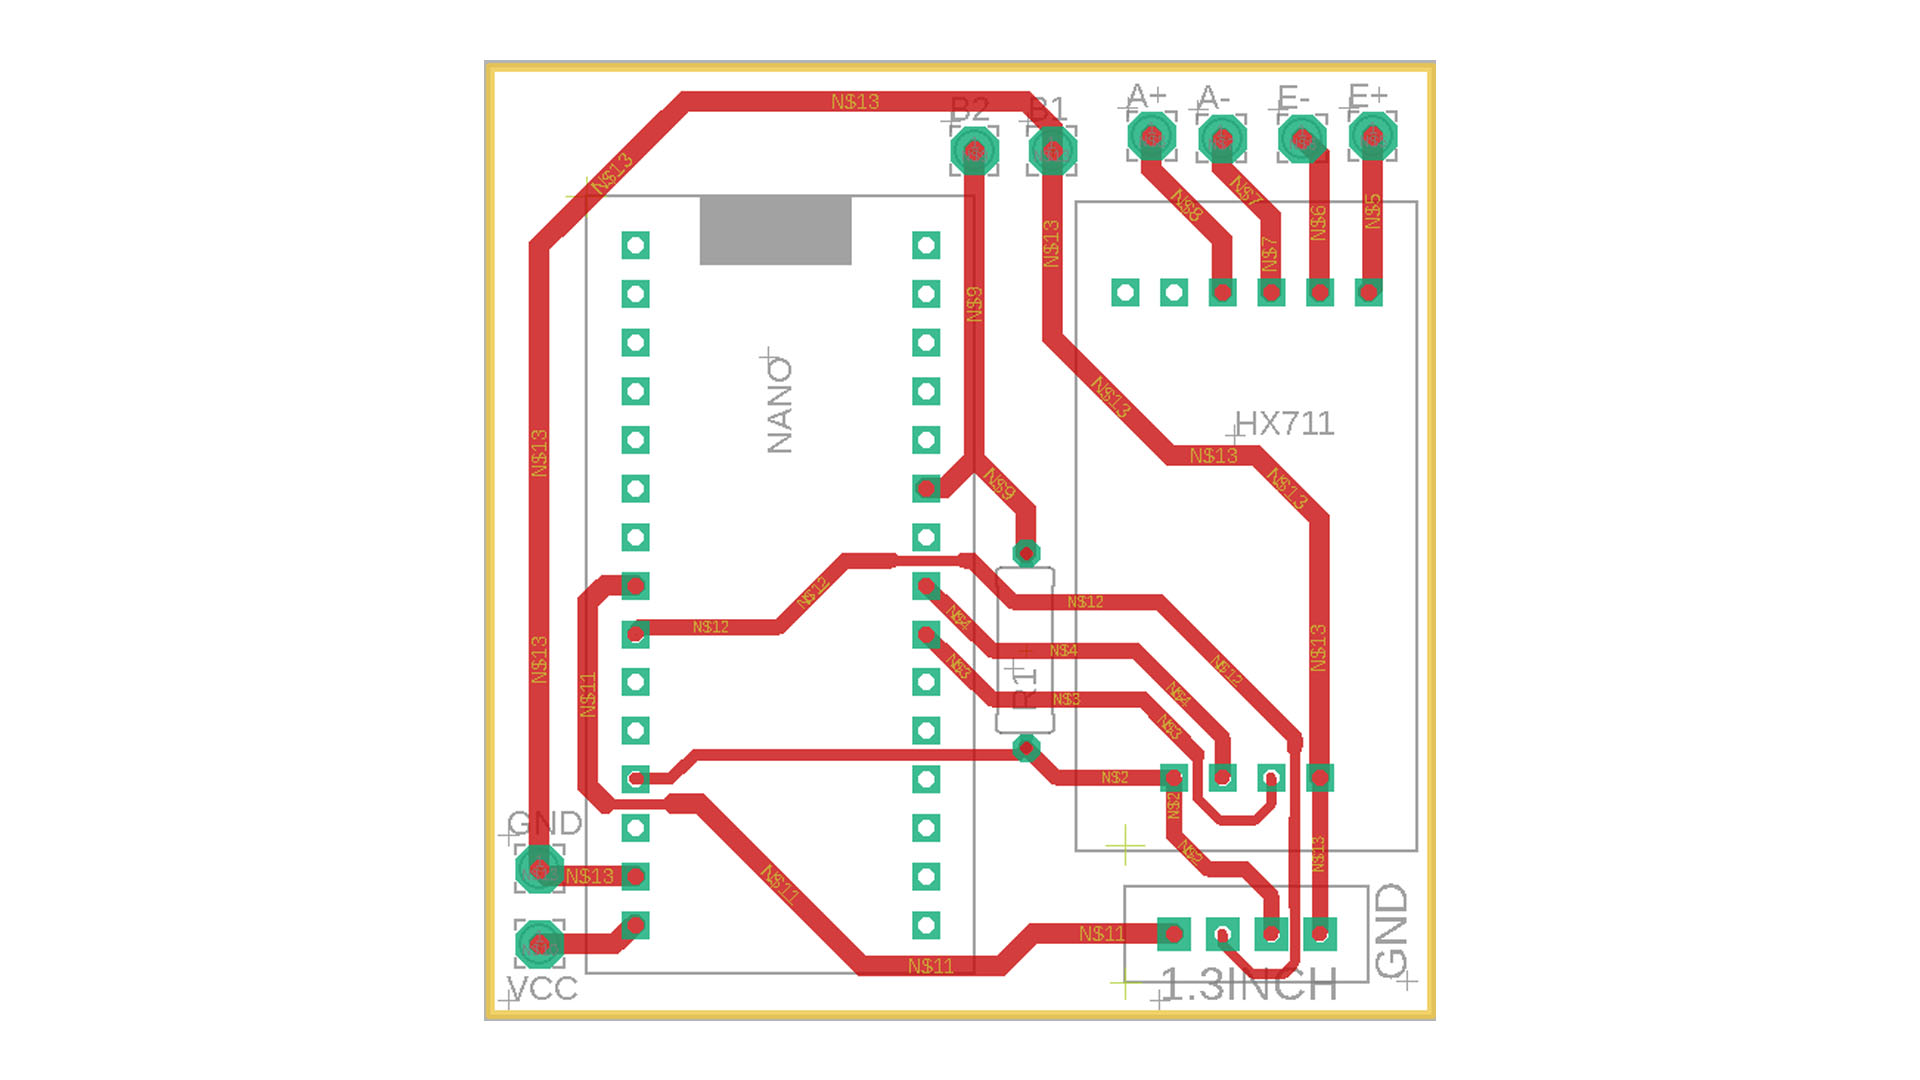
Arduino Files & 3D Files & Gerber Files: https://drive.google.com/file/d/174cPp-ucNI5Vp799bI-Xuh0_hA0JaEov/view?usp=sharing
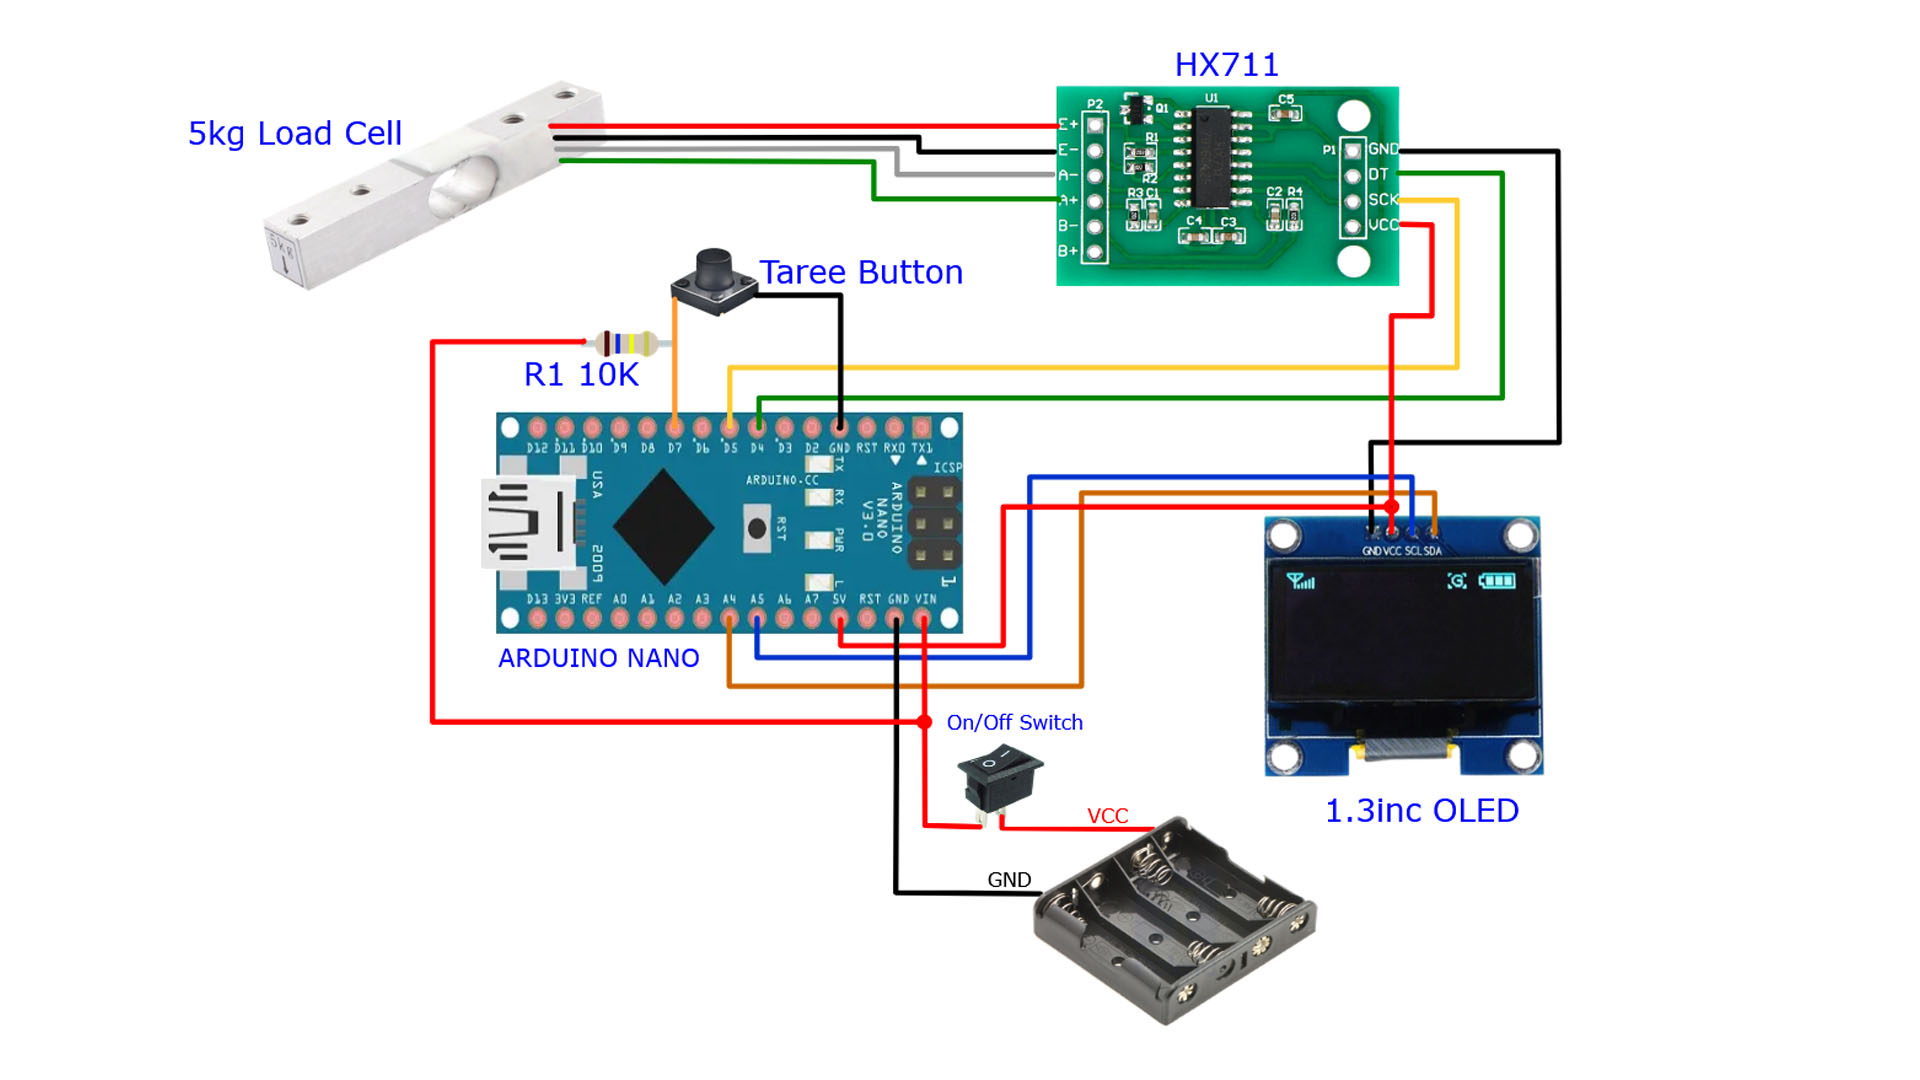
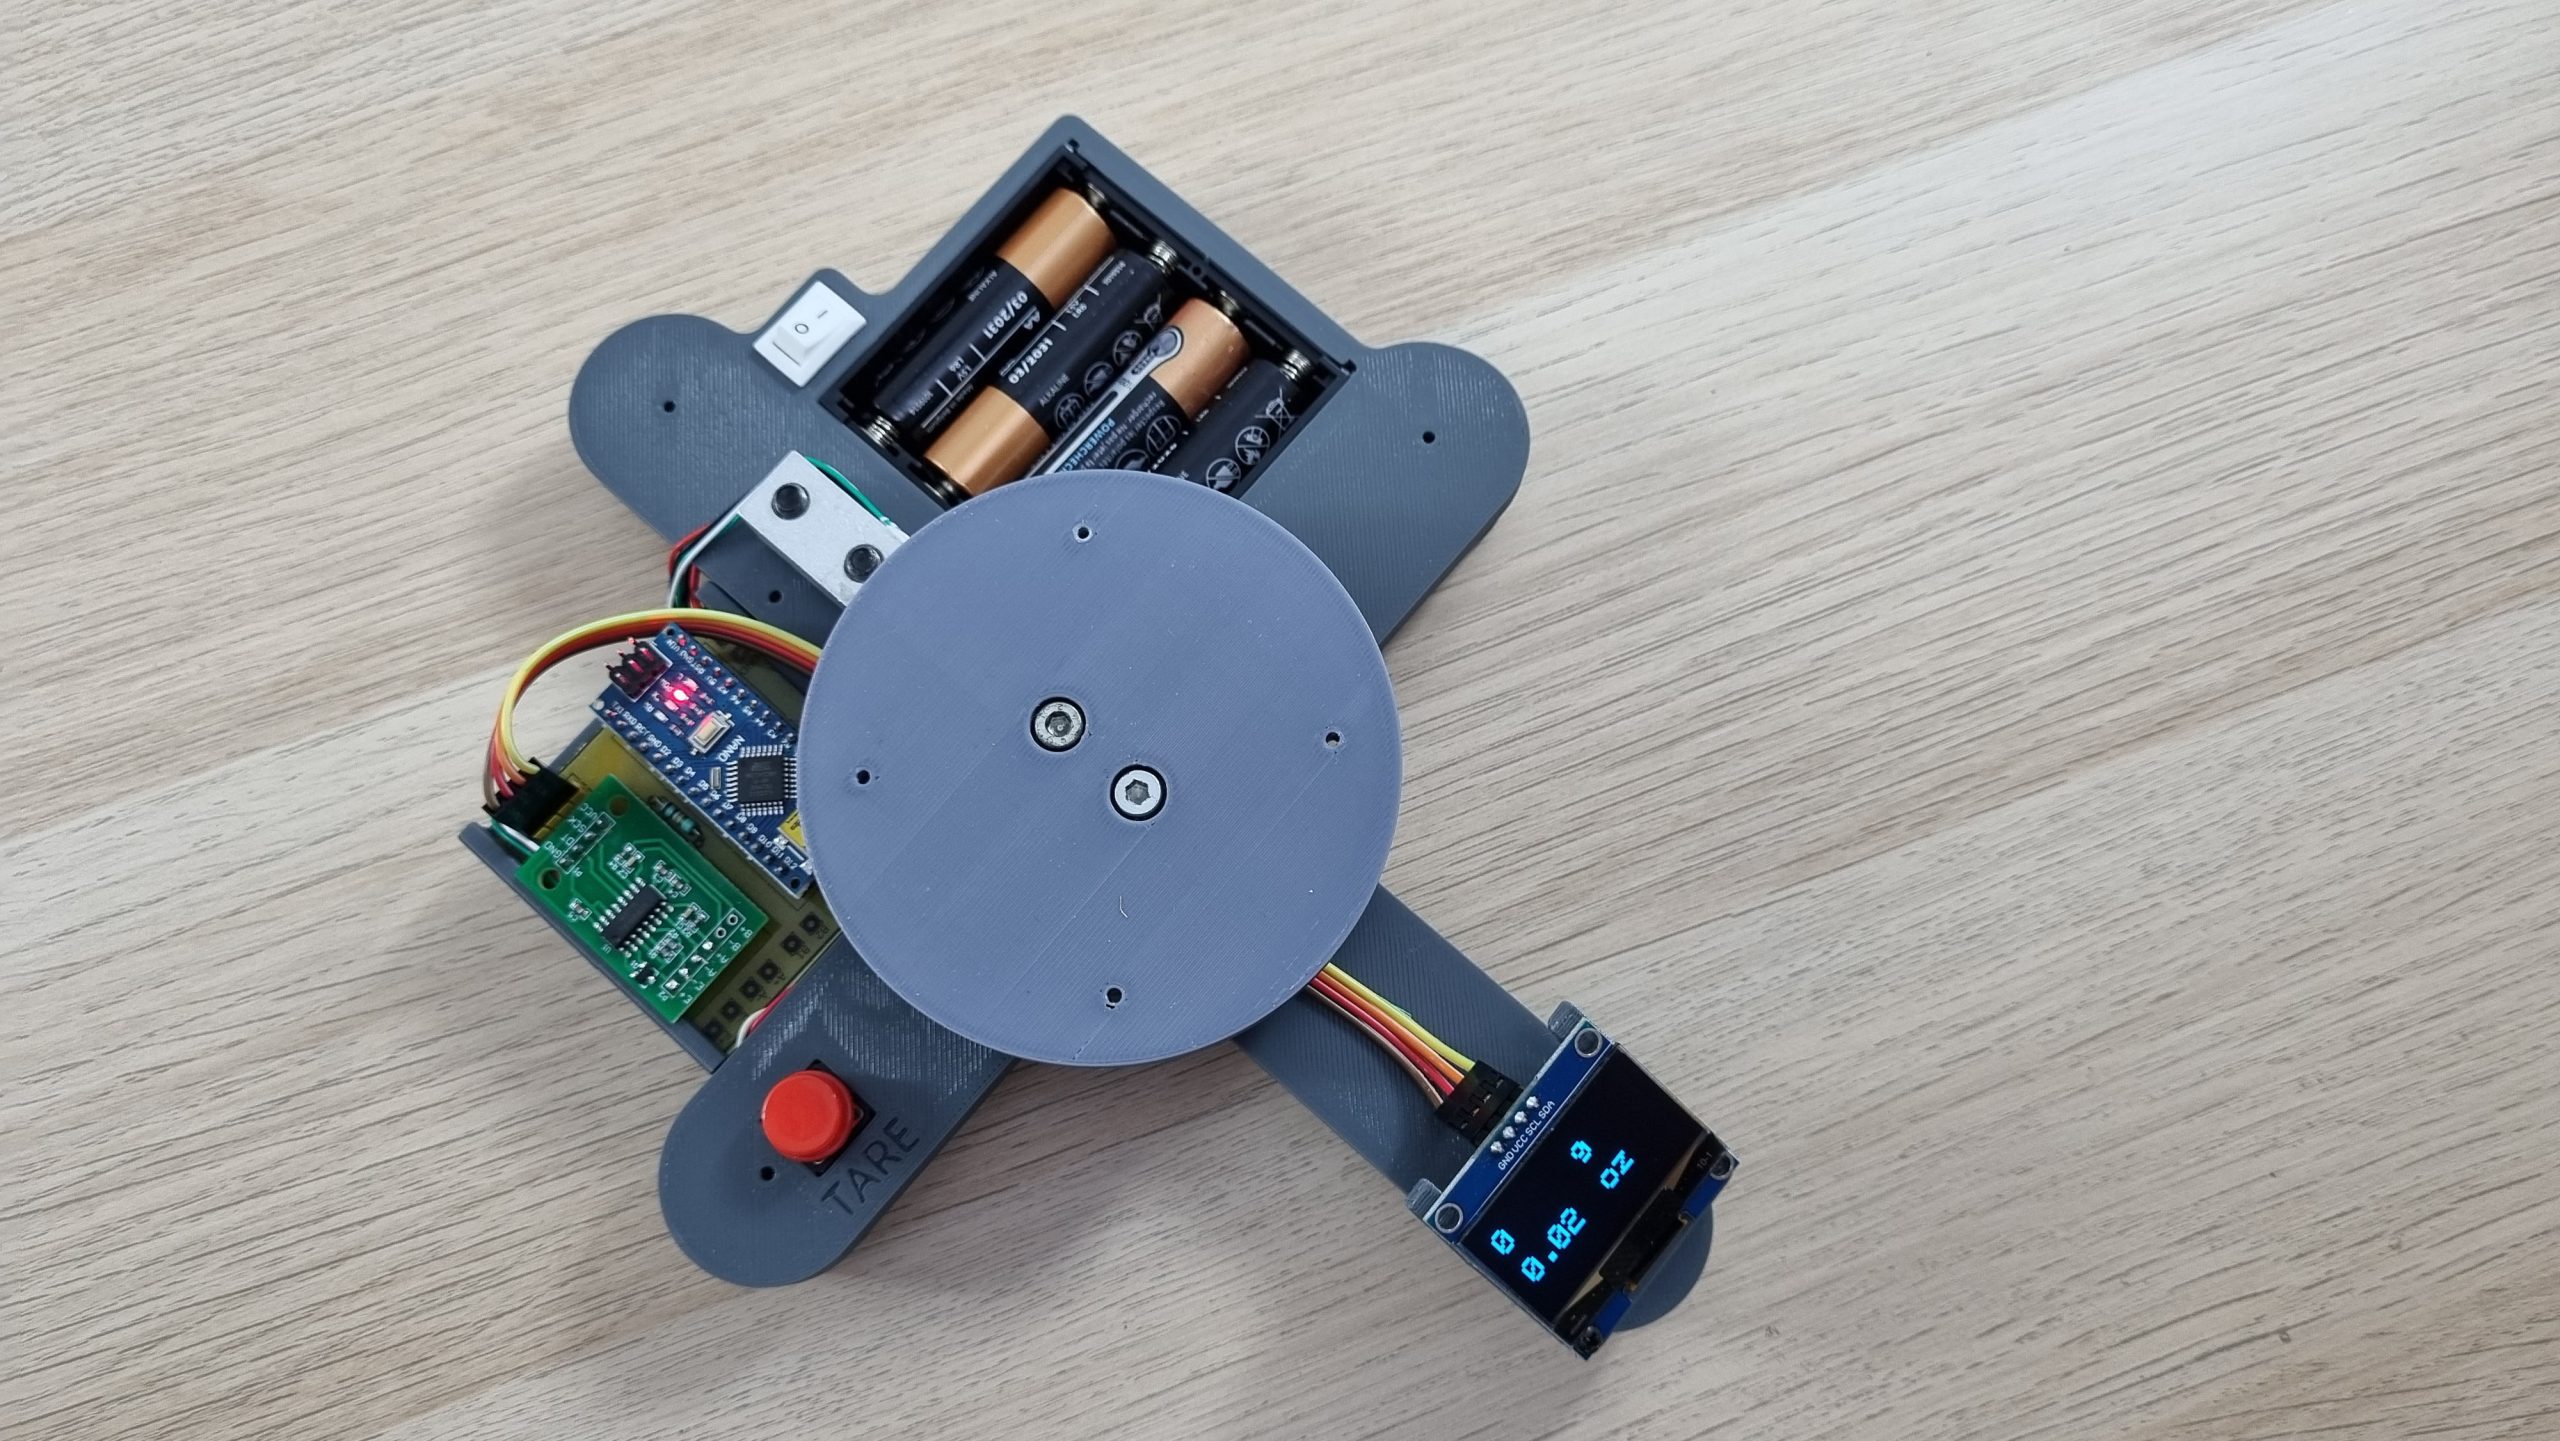
Power source: The scale circuit is powered by 4 AA (4×1.5V=6V) batteries.
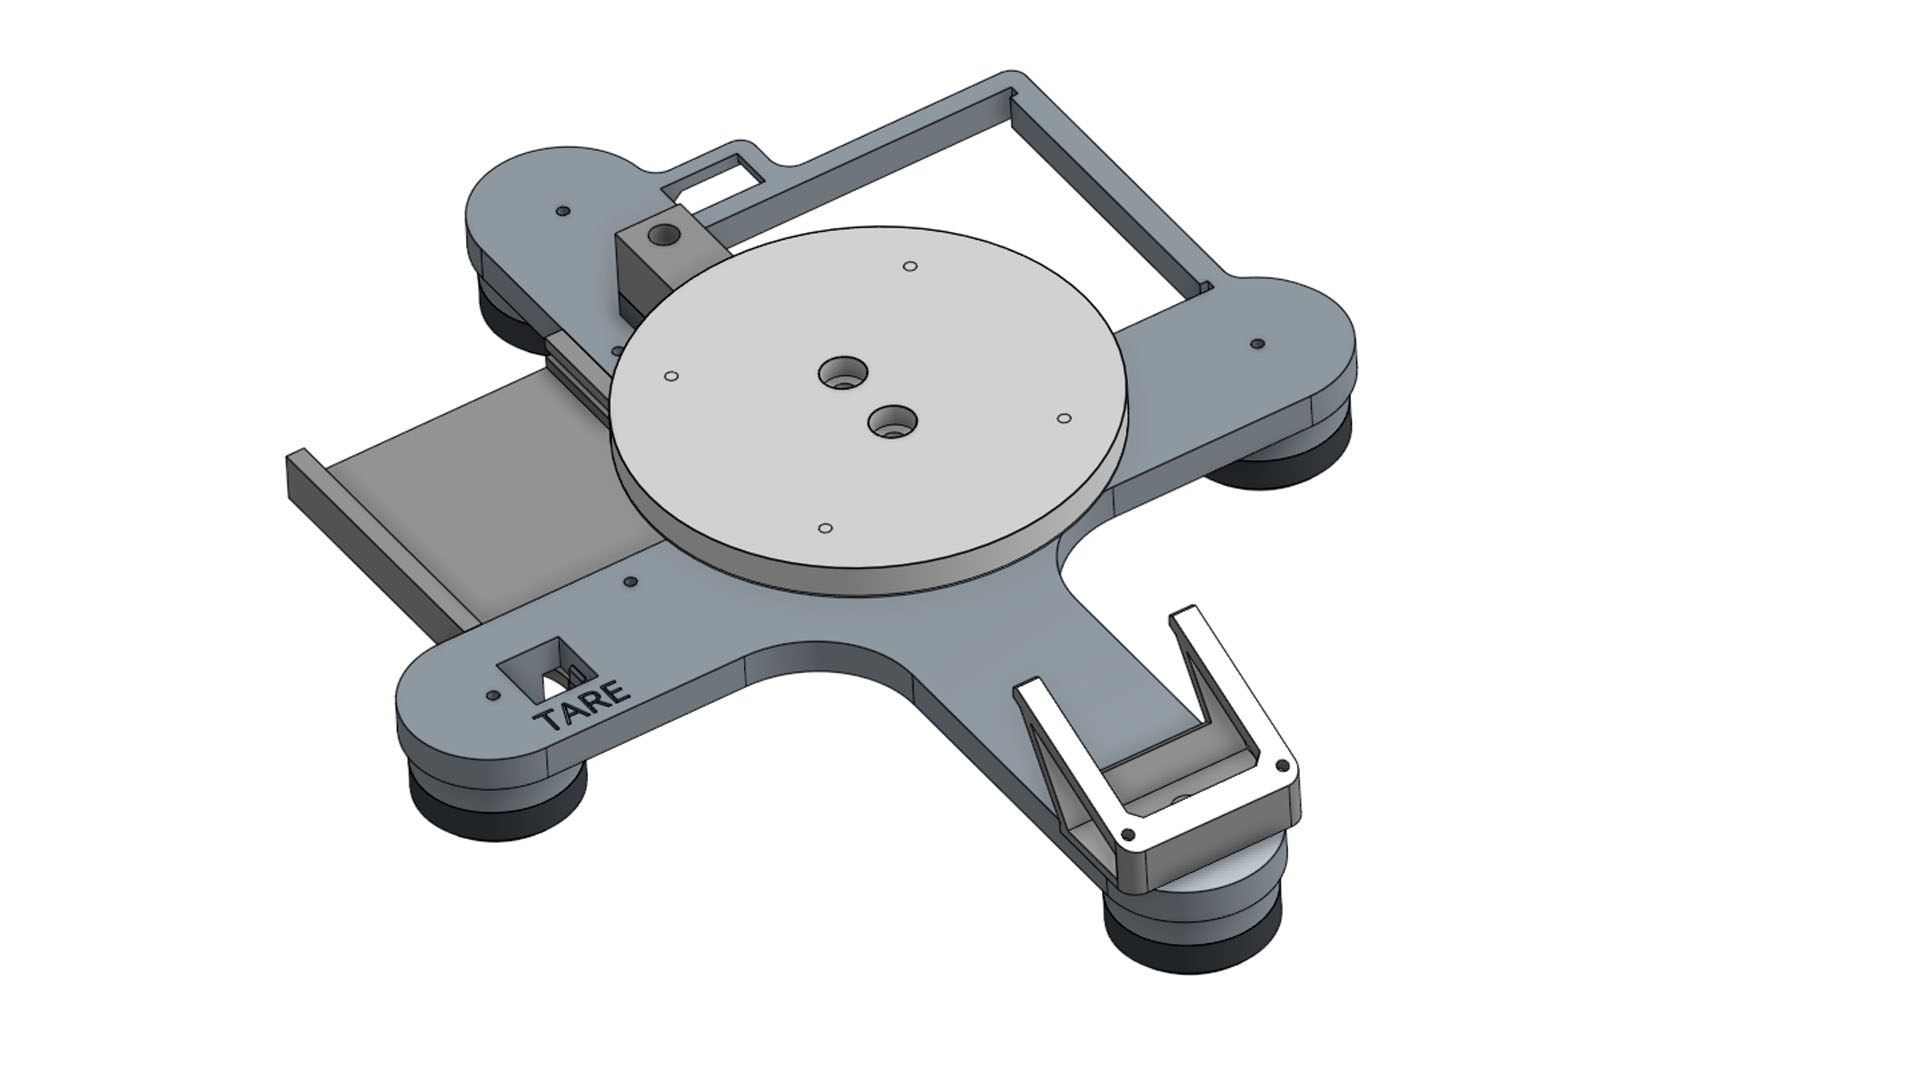
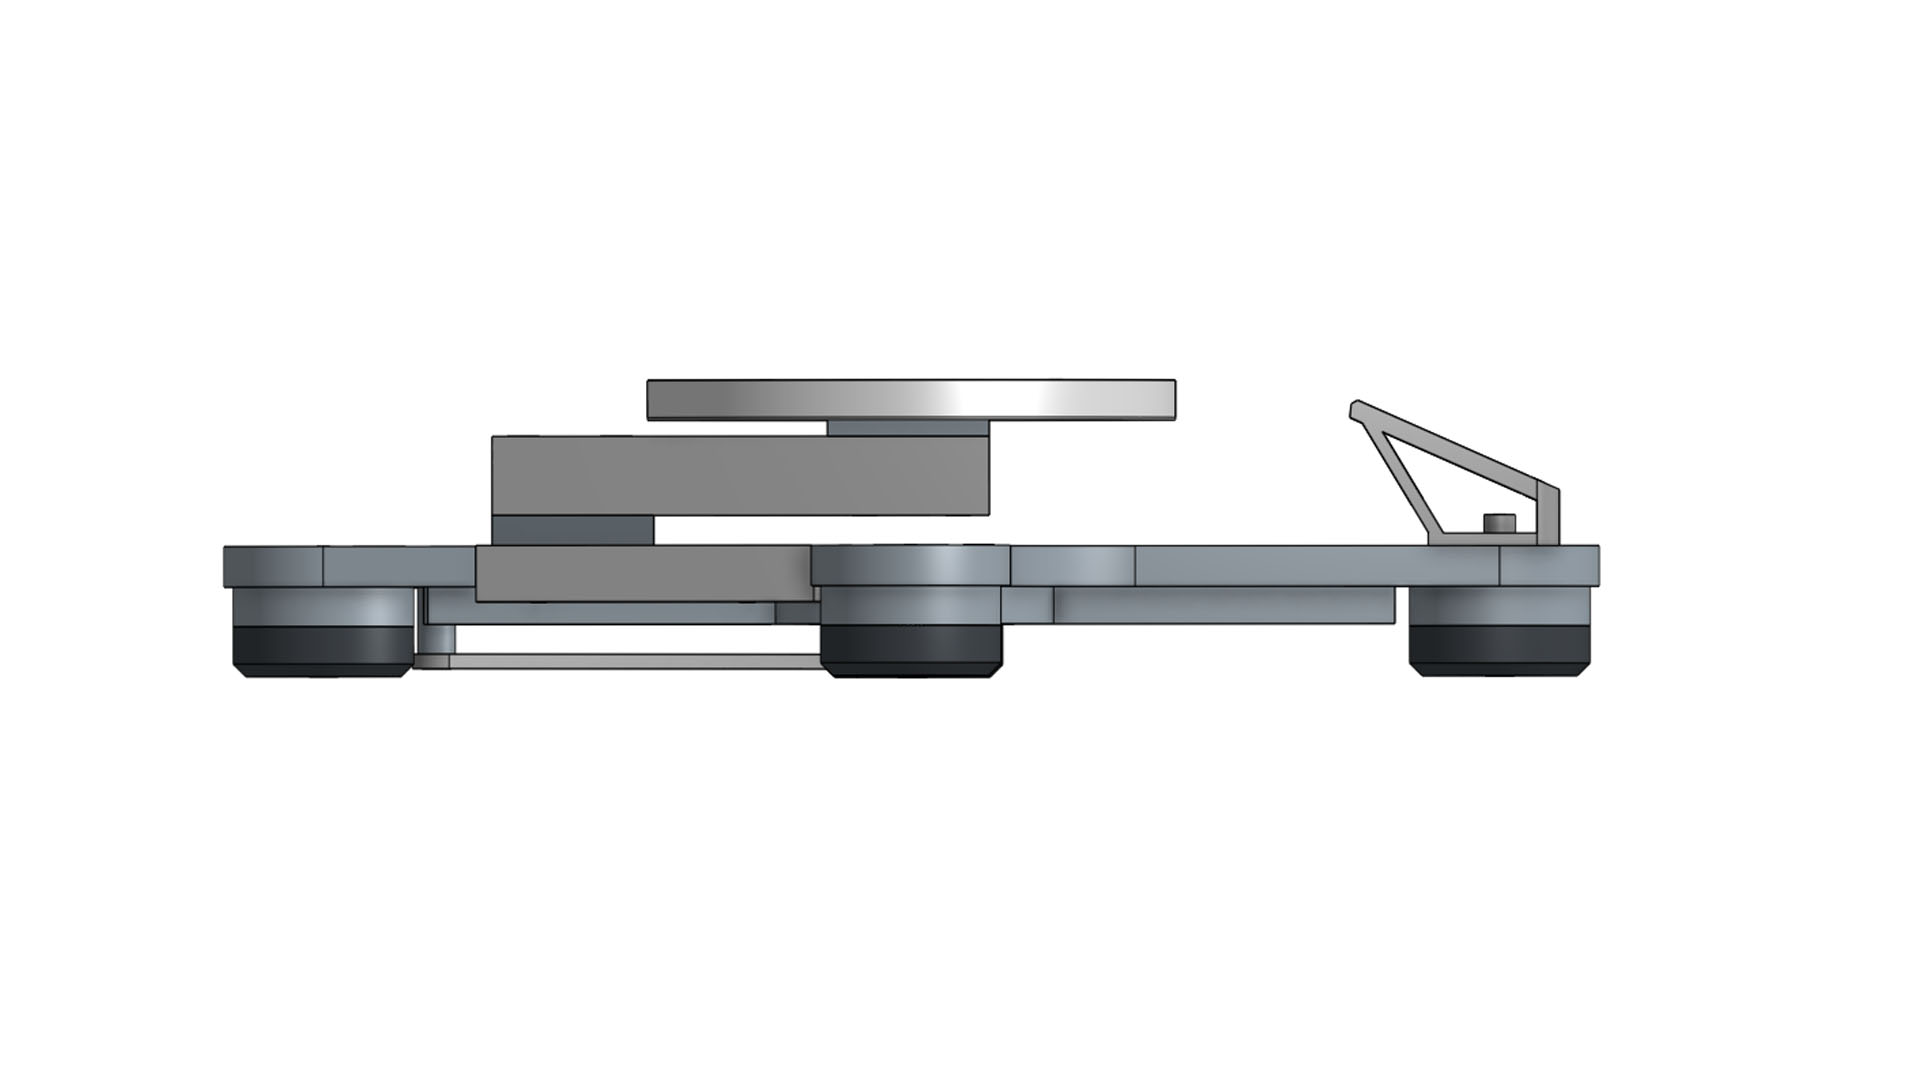
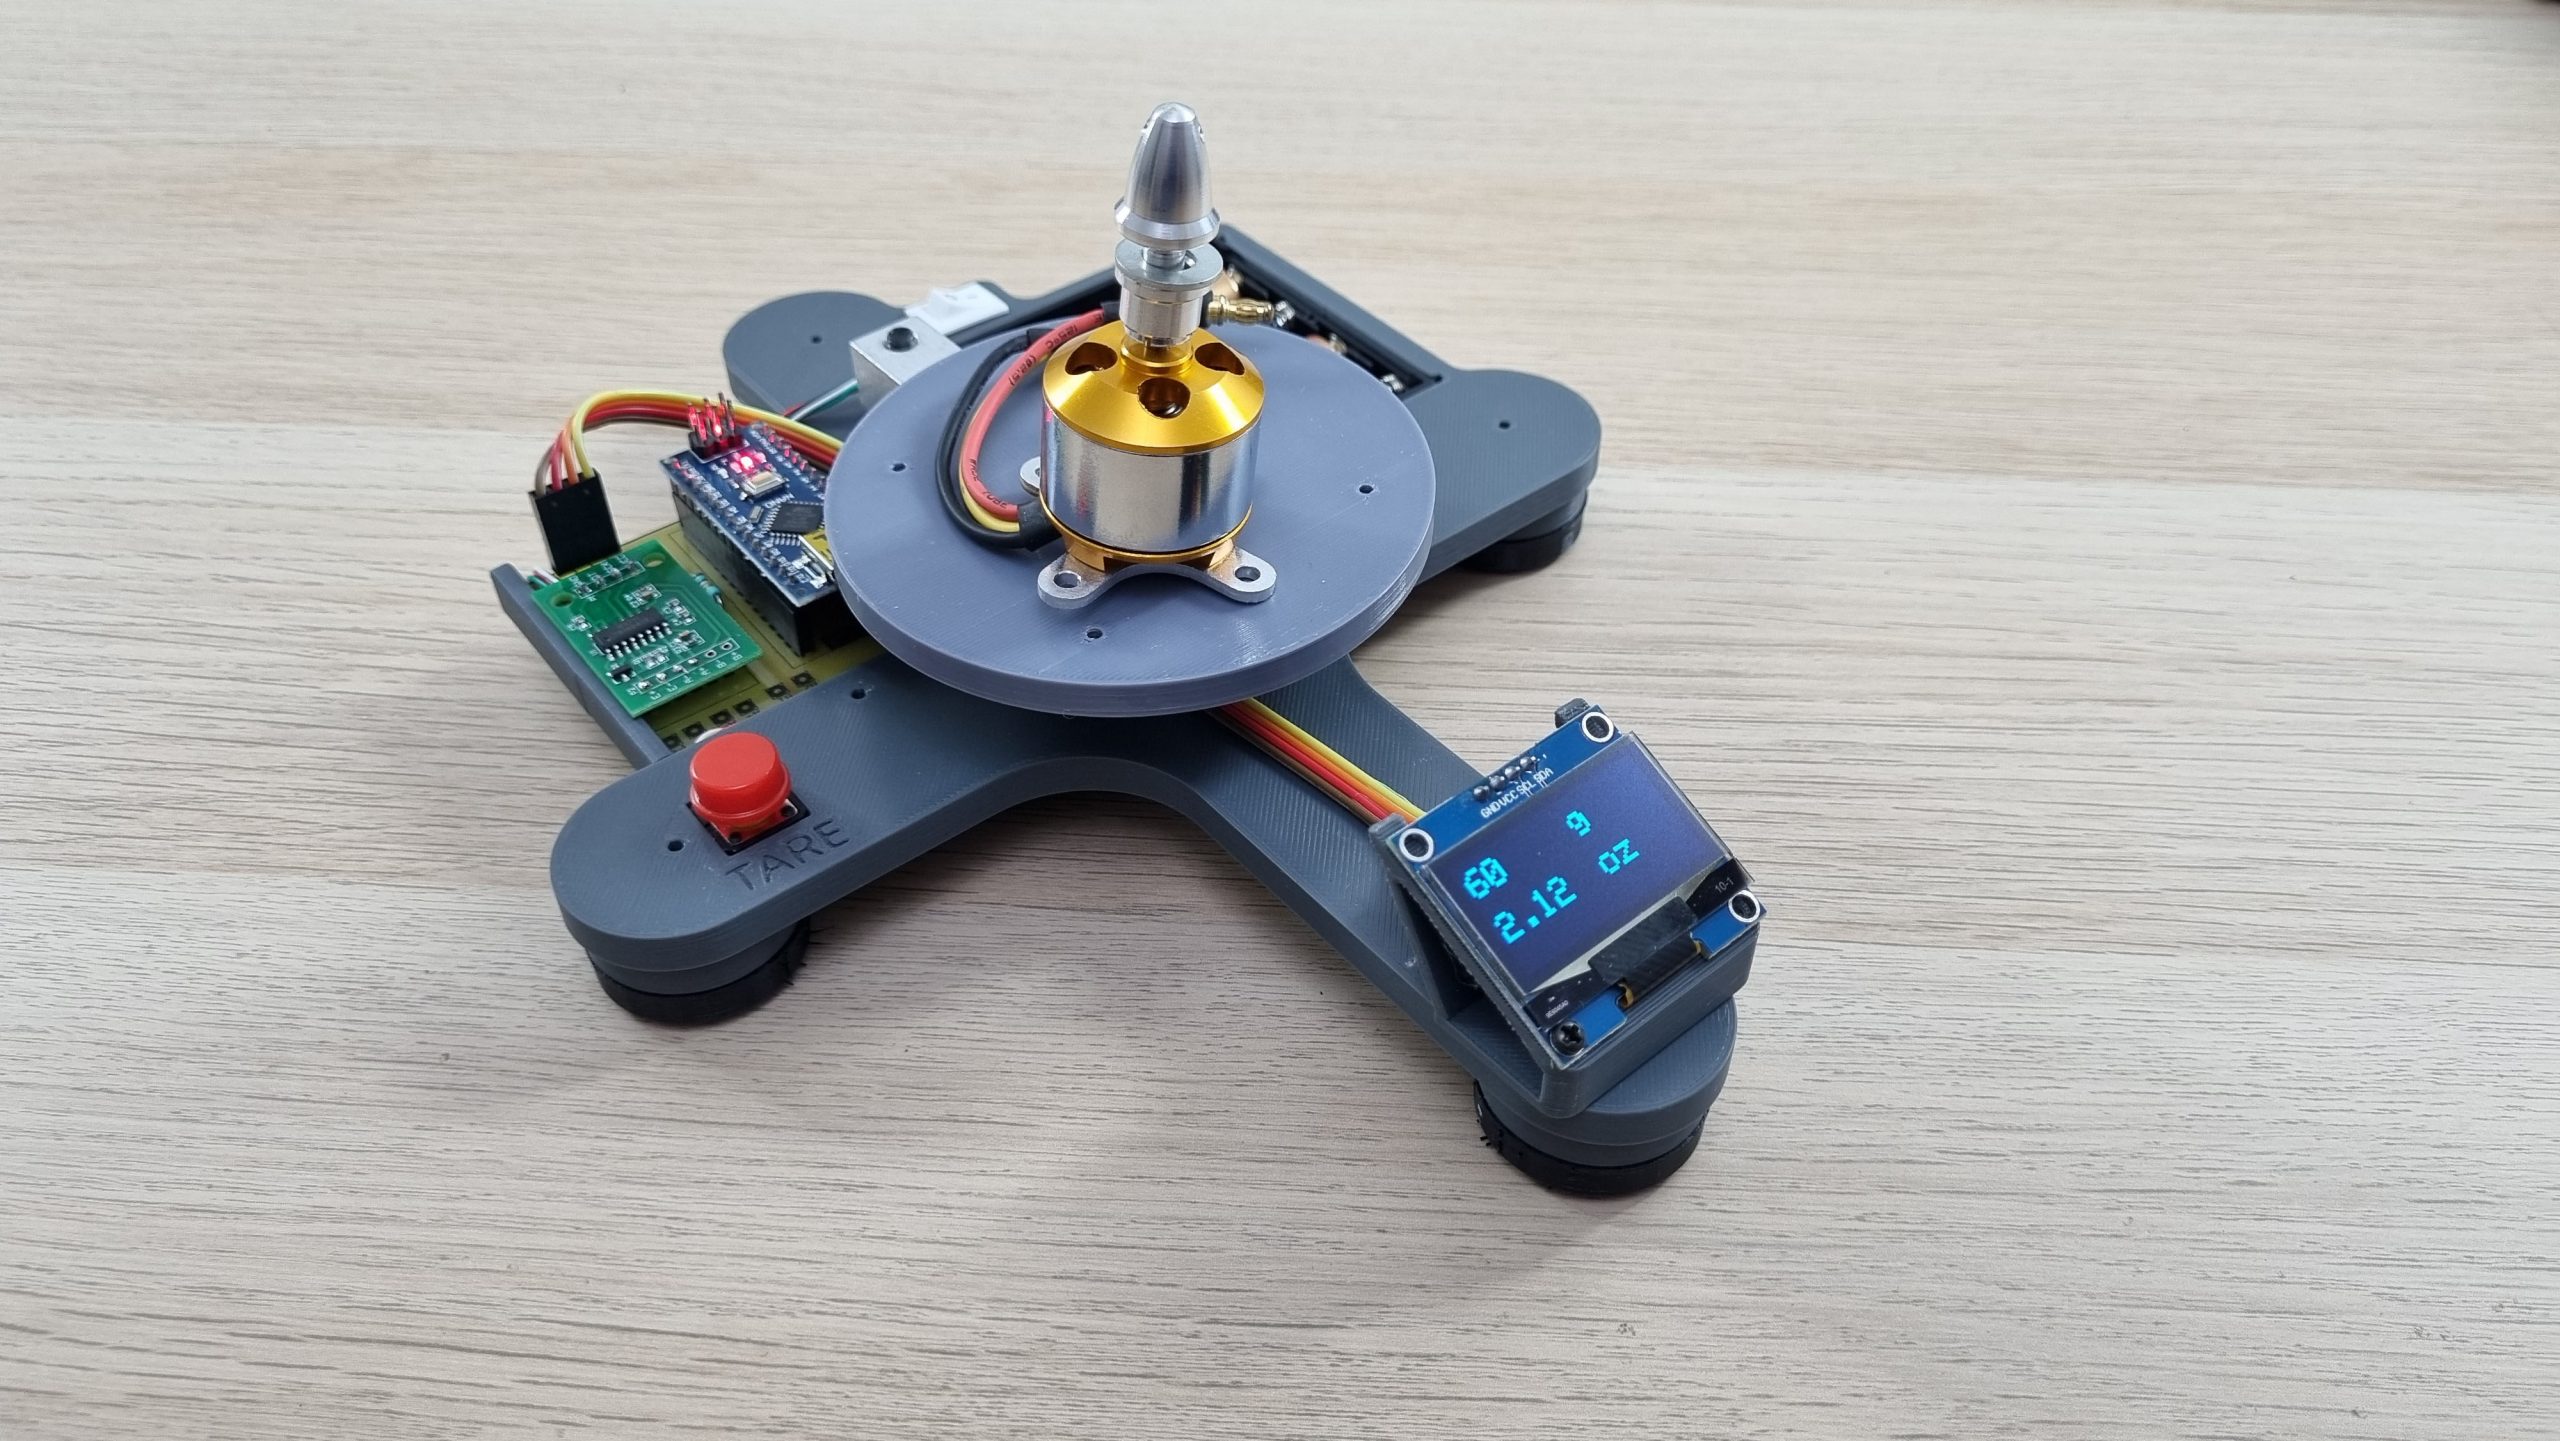
3D Printed Parts …
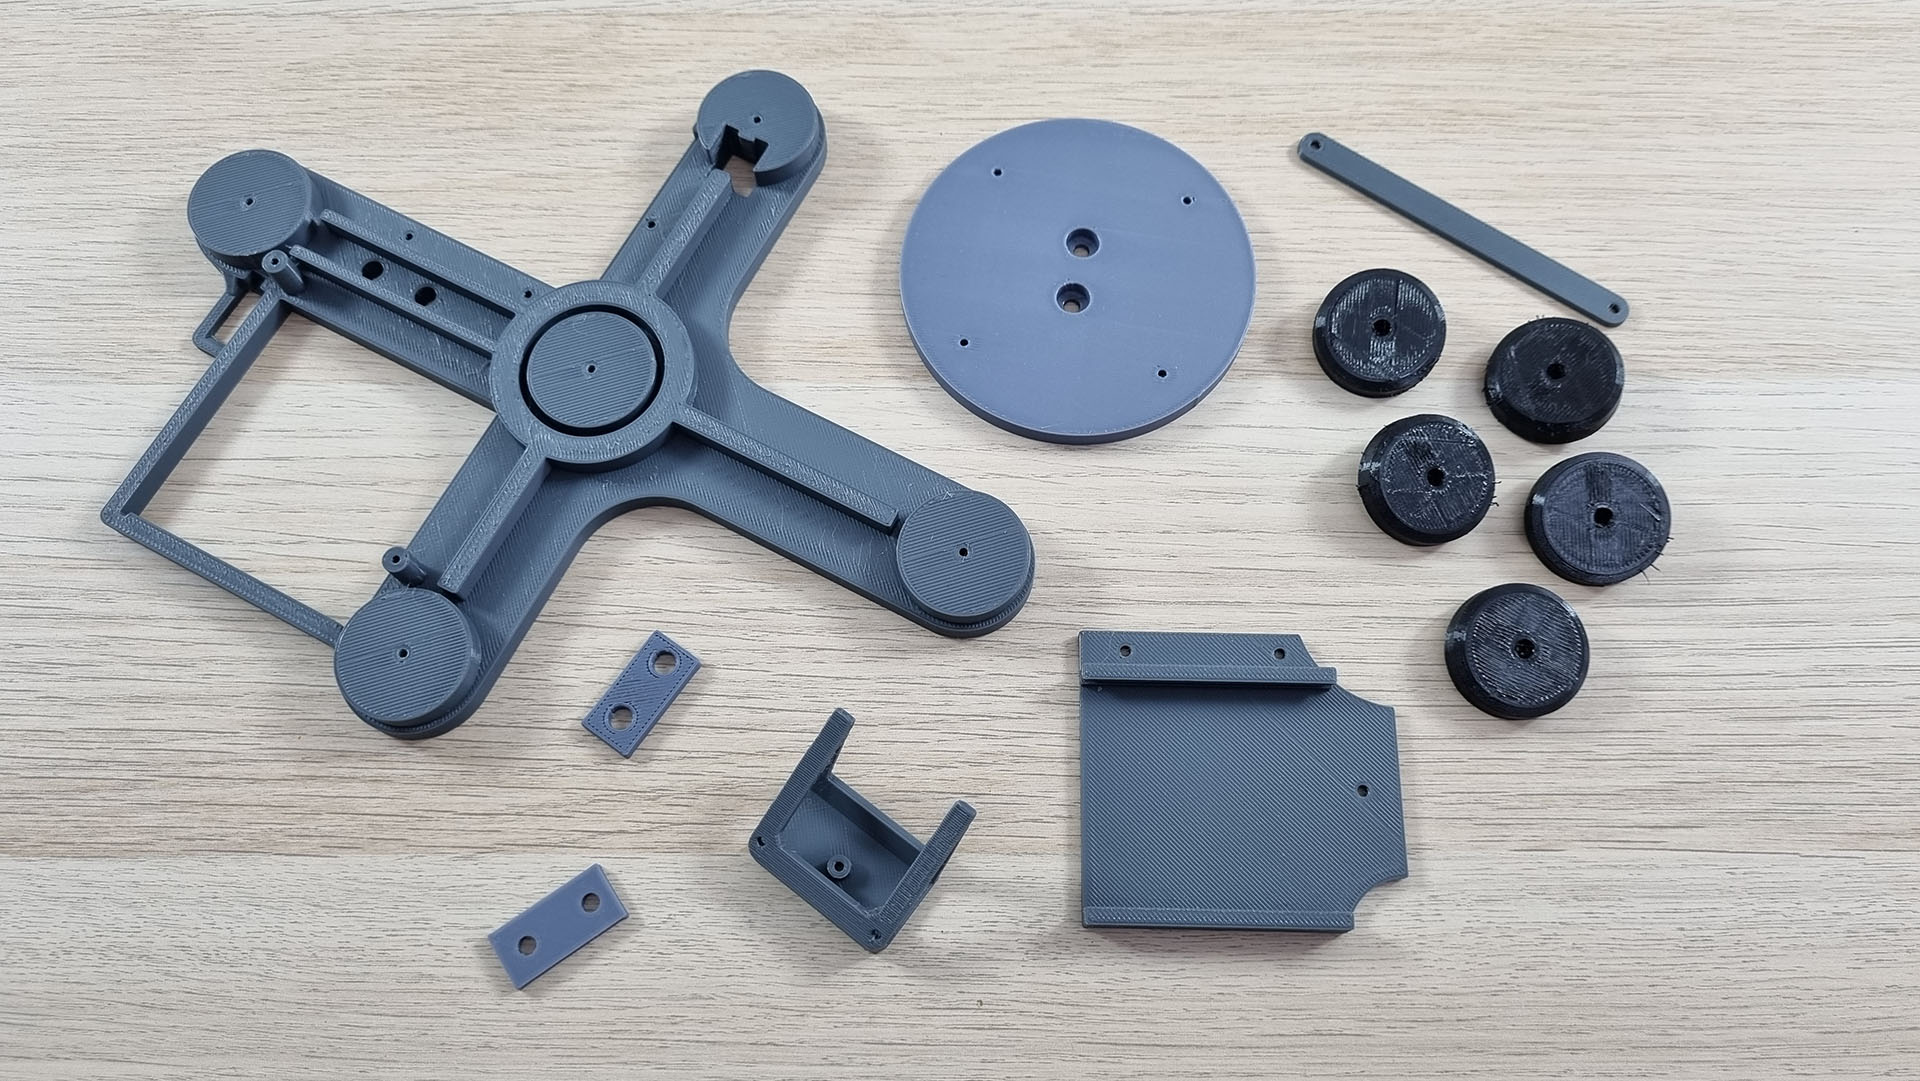
The feet are printed with TPU (Flex Filament). All other parts are printed with PLA filament. Standard draft settings are sufficient for printing.
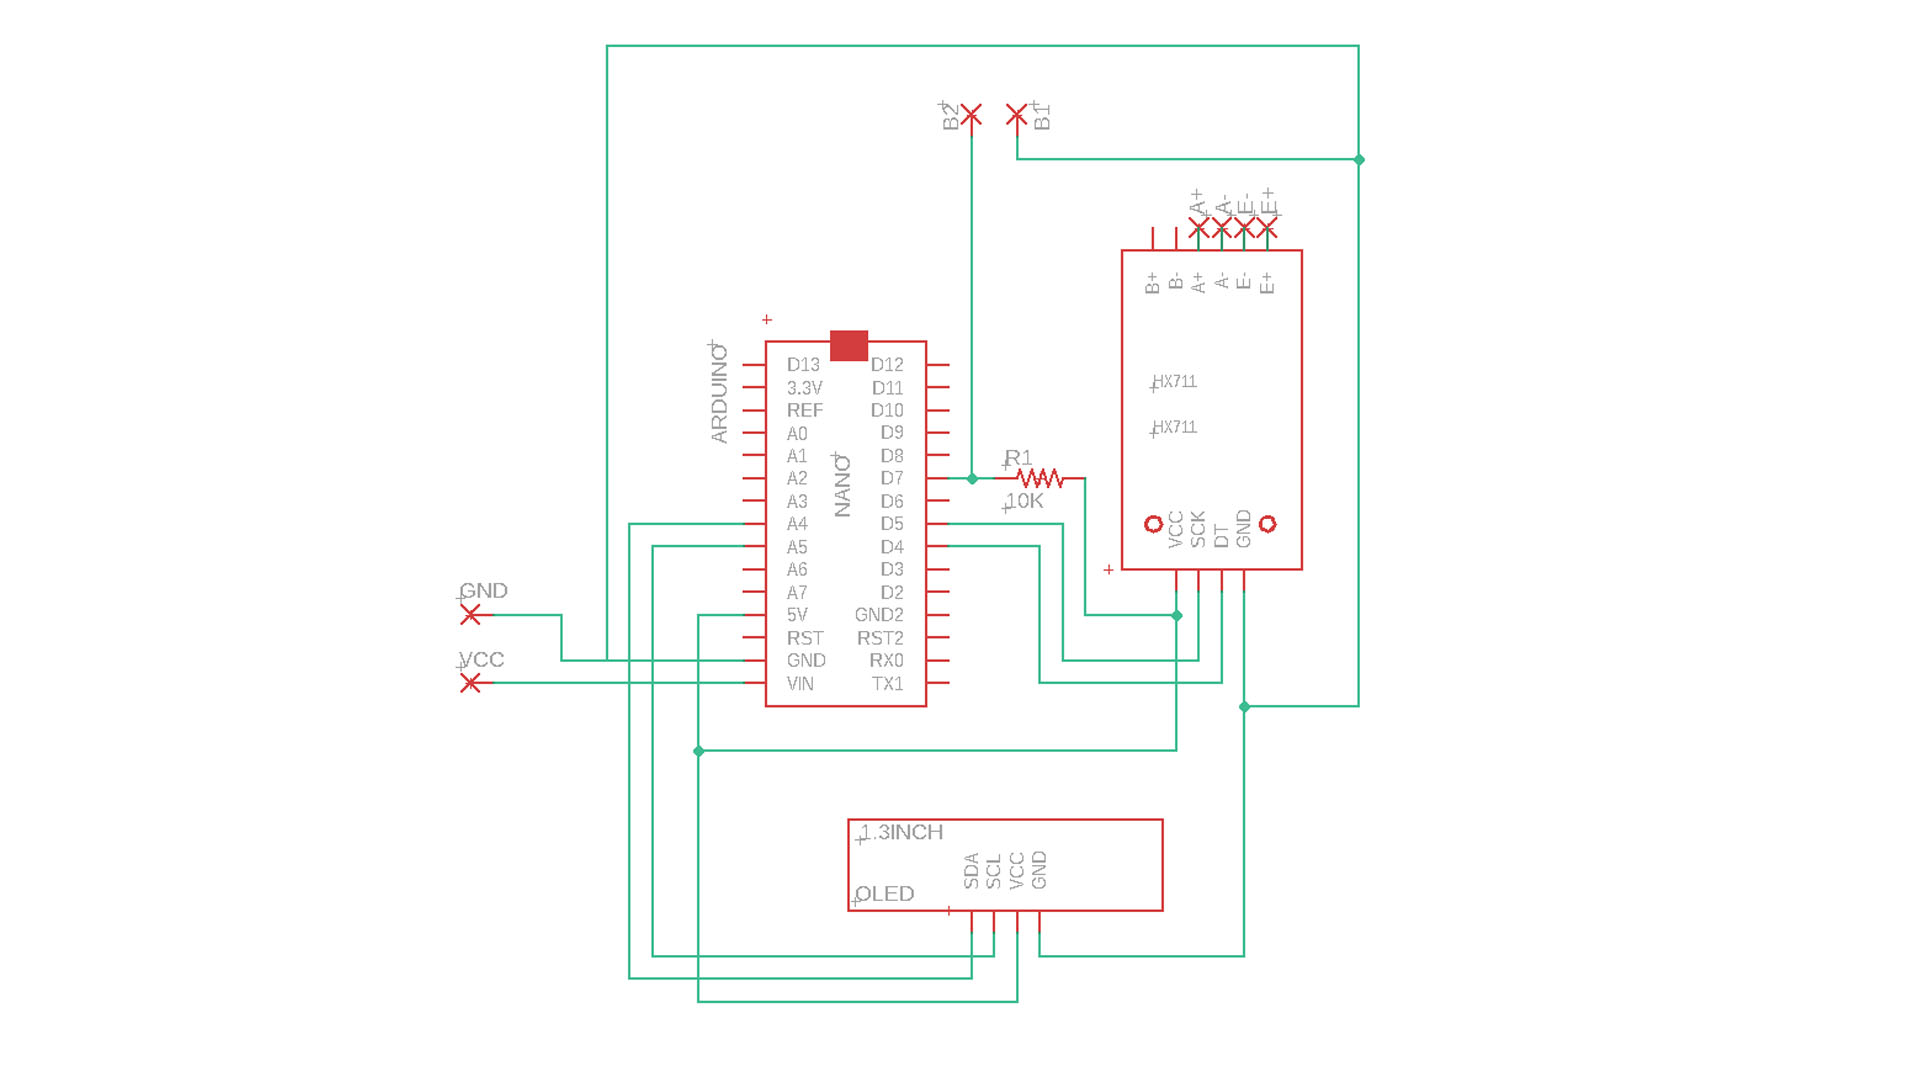
Necessary materials:
5kg Load cell & HX711 module: https://s.click.aliexpress.com/e/_DDKLo6j
Arduino Nano: https://s.click.aliexpress.com/e/_DmlZY0P
1.3inc Oled Screen (4 Pins): https://s.click.aliexpress.com/e/_De9jsa3
4 AA Battery Box: https://s.click.aliexpress.com/e/_DlEyhoT
Copper circuit plate (5×5 or 5×7): https://s.click.aliexpress.com/e/_DeDWEdD
12x12x6 tact push button: https://s.click.aliexpress.com/e/_DdzsQeF
Rocker Switch: https://s.click.aliexpress.com/e/_DdlxZyT
10K resistor: https://s.click.aliexpress.com/e/_DklJgdt
Pin Header connector: https://s.click.aliexpress.com/e/_DddNsEF
4 Pin Jumper cable wire 2.54 (20cm): https://s.click.aliexpress.com/e/_DmYLKVv
“LoadCell.setCalFactor(399);” 399 in this row is a value for calibration. The correct number for me is 399. You may need to find the right calibration value for you. You can get the correct value by trying it with a fixed weight (for example 1kg). You may need to try 3-5 times to get the correct calibration by increasing or decreasing this number.
Full Code for Arduino Scales:
#include <HX711_ADC.h> // https://www.arduino.cc/reference/en/libraries/hx711_adc/
#include <Wire.h>
#include <Adafruit_SH110X.h>

#define i2c_Address 0x3c // Oled Screen adress 0x3C | Oled ekran adresi 0x3C
#define OLED_RESET -1
int width = 128; // Screen Width | OLED ekran genişliği (piksel olarak)
int height = 64; // Screen Width | OLED ekran yüksekliği (piksel olarak)
Adafruit_SH1106G display = Adafruit_SH1106G(width, height, &Wire, OLED_RESET);

HX711_ADC LoadCell(4, 5); // dt pin, sck pin
int taree = 7; // taree button pin
int gr = 0;
float oz = 0;
float weight = 0;

void setup() {
  display.begin(i2c_Address, true);
  display.clearDisplay();
  display.setTextColor(SH110X_WHITE);
  display.setTextSize(1);
  display.display();
  display.clearDisplay();

  pinMode (taree, INPUT_PULLUP);
  LoadCell.begin(); // start connection to HX711 | HX711 bağlantısı başlatma
  LoadCell.start(1000); // load cells gets 1000ms of time to stabilize

  LoadCell.setCalFactor(399); // calibration value | kalibrasyon değeri

delay(200);
}
void loop() {

display.setTextColor(SH110X_WHITE);  // OLED Ekrana Yazma

  LoadCell.update(); // Retrieves data from the load cell | Yük hücresinden veri alma
  weight = LoadCell.getData();

 if (weight<0)
 {
   weight = weight * (-1);
 }
  gr = weight;
  display.setTextSize(2);
  display.setCursor(3, 6); // set cursor  |  imleç konumu
  display.print(gr, 1); // Printing the output in grams to the screen |  gram cinsinden çıktıyı ekrana yazdırma
  display.setCursor(60, 6);
  display.print(" g");

  oz = weight/28.3495;
  display.setTextSize(2);
  display.setCursor(3, 32);
  display.print(oz, 2); // Printing the output in oz to the screen |  oz cinsinden çıktıyı ekrana yazdırma
  display.setCursor(60, 32);
  display.print(" oz");

  if (weight>=5000)
  {
    weight=0;
  display.setCursor(2, 49); // set cursor  | imleç konumu
  display.print(" Over Loaded ");
  delay(200);
  }
  if (digitalRead (taree) == LOW)
  {
    display.setTextSize(2);
    display.setCursor(8, 49); // set cursor | imleç konumu
    display.print(" Taring.. ");
    LoadCell.start(1000);
    display.setCursor(0, 46);
    display.print("             ");

  }

gr = 0;
oz = 0;
weight = 0;

display.display();
display.clearDisplay();
}
HX711 library download link: https://www.arduino.cc/reference/en/libraries/hx711_adc/
Oled Screen Library: https://www.arduino.cc/reference/en/libraries/adafruit-sh110x/
Note 1: Depending on the features of your current oled screen, a different version of the library file may be required.
Note 2: If you get an error regarding the “HX711_ADC” library, you should try different versions of this library file.
Note 3: The 0x3c address in the “#define i2c_Address 0x3c” line is related to the Oled display. It may not be the same for the screen you have. While your OLED display is connected to Arduino, you can find the correct address with the code below. There is address information on the back of some screens.
A video of me using the scale…
I2C Adress Finder Code (For Oled Screen Adress):
//  I2C Adress Finder | Adres Bulma

#include "Wire.h"

int hata, adres, cihaz_adet;

void setup() {
  Wire.begin();
  Serial.begin(9600);
}

void loop() {
  cihaz_adet = 0;
  for (adres = 1; adres < 127; adres++ ) {
    Wire.beginTransmission(adres);
    hata = Wire.endTransmission();

    if (hata == 0) {
      Serial.print("I2C Device Found | Cihaz Bulundu! | Adres: 0x");
      if (adres < 16) Serial.print("0");
      Serial.println(adres, HEX);
      cihaz_adet++;
    }
    else
      if (hata == 4) {
        Serial.print("Unknown Error | Bilinmeyen Hata: 0x");
        if (adres < 16) Serial.print("0");
        Serial.println(adres, HEX);
      }
  }
  if (cihaz_adet == 0)
    Serial.println("I2C Device Not Found | I2C Cihaz Bulunamadı ...");
  delay(3000);
}
INFO: You can copy and paste the Arduino code into a blank Arduino IDE page. Or you can download it from the link above.